GMC Terrain: Bulb Replacement
Bulb Replacement
For the proper type of replacement bulbs, see Replacement Bulbs on page 10‑37.
For any bulb changing procedure not listed in this section, contact your dealer.
Headlamps, Front Turn Signal, Sidemarker, and Parking Lamps
A. Low-Beam Headlamp
B. High-Beam Headlamp
C. Sidemarker Lamp
D. Park/Turn Signal Lamp
To replace one of these bulbs:
1. Turn the tire to reach the access port cap located in the front of wheel well cover.
A. Screw
B. Access Port Cap
2. Remove the screw (A) and turn the access port cap (B) counterclockwise to remove.
3. If replacing a headlamp bulb, remove the dust cover cap from the back of the headlamp housing by turning the cap counterclockwise.
4. Turn the bulb socket counterclockwise to remove it from the lamp assembly.
5. Remove the bulb from the socket or disconnect the bulb assembly from the harness
connector.
6. Install the new bulb.
7. Reinstall the bulb socket to the lamp assembly, turning clockwise.
8. Replace the dust cover cap on headlamps.
9. Reinstall the wheel well cover access port cap and secure by installing the screw.
Fog Lamps
To replace one of these bulbs:
1. Locate the fog lamp assembly under the front facia.
2. Disconnect the bulb socket from the electrical connector, turn, and pull out the bulb assembly.
3. Remove the old bulb from the bulb socket and push the new bulb straight into the bulb socket until it connects.
4. Push the bulb socket into the fog lamp assembly and turn clockwise to lock it into place.
5. Reconnect the bulb socket to the electrical connector.
Taillamps, Turn Signal, Sidemarker, Stoplamps, and Back-Up Lamps
A. Stop/Tail/Turn Signal/ Sidemarker Lamp
B. Auxiliary Taillamp
C. Back-up Lamp
Stop/Tail/Turn Signal/ Sidemarker Lamp
To replace one of these lamps:
1. Open the liftgate. See Liftgate on page 2‑9.
2. Remove the two screw covers from the taillamp assembly.
3. Remove the two screws securing the taillamp assembly.
4. Pull the taillamp assembly out of the vehicle body.
5. Disconnect the lamp wiring harness.
6. Turn the bulb socket counterclockwise and pull it out.
7. Pull the bulb straight out of the socket.
8. Install the new bulb.
9. Push the bulb socket in and turn it clockwise.
10. Reverse Steps 2 through 5 to reinstall the lamp assembly.
11. Verify that the taillamp assembly tab, located at the bottom of the taillamp assembly, is aligned to the facia bracket before securing with screws.
Auxiliary Taillamp
To replace one of these lamps:
1. Open the liftgate. See Liftgate on page 2‑9.
2. Remove the interior trim access panel.
A. Attachment Nuts
B. Retaining Hook
3. Remove the five attachment nuts (A) securing the taillamp assembly to the
liftgate.
4. Disengage the retaining hook (B) and pull the taillamp assembly out of the vehicle
liftgate.
5. Disconnect the lamp wiring harness.
6. Turn the bulb socket counterclockwise and pull it out.
7. Pull the bulb straight out of the socket.
8. Install the new bulb.
9. Push the bulb socket in and turn it clockwise.
10. Reverse Steps 2 through 5 to reinstall lamp assembly.
Back–Up Lamp
Removal of the lamp assembly is not required to replace the back-up lamp bulb.
To replace one of these lamps:
1. Open the liftgate. See Liftgate on page 2‑9.
2. Remove the interior trim access panel.
3. Turn the bulb socket counterclockwise and pull it out.
4. Pull the bulb straight out of the socket.
5. Install the new bulb.
6. Push the bulb socket in and turn it clockwise.
7. Reinstall the interior trim access panel.
License Plate Lamp
To replace one of these bulbs:
1. Open the liftgate partway. See Liftgate on page 2‑9.
Passenger Side Shown, Driver Side Similar
2. Push the left end of the lamp assembly toward the right.
3. Pull the lamp assembly down to remove it from the liftgate.
A. Bulb Socket
B. Bulb
C. Lamp Assembly
4. Turn the bulb socket (A) counterclockwise to remove it from the lamp assembly (C).
5. Pull the bulb (B) straight out of the bulb socket.
6. Push the replacement bulb straight into the bulb socket and turn the bulb socket clockwise to install into lamp assembly.
7. Turn the lamp assembly into the liftgate engaging the clip side first.
8. Push on the lamp side opposite the clip until the lamp assembly snaps into place.
Replacement Bulbs
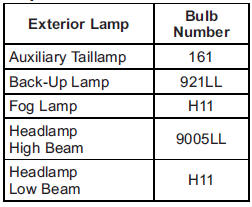
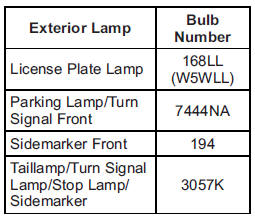
For replacement bulbs not listed here, contact your dealer.
 Vehicle Checks
See also:
Hazard warning flasher
The Hazard Warning Flasher switch is located on the
lower switch bank below the climate controls.
Press the switch to turn on the
Hazard Warning
flasher. When the switch is activated, all directional
turn signals will flash on and off to war ...
Maintenance tools
Your vehicle is equipped with the following
maintenance tools:
- Jack
- Jack handle
- Screwdriver
- Towing hook (eye bolt)
- Wheel nut wrench
- Hex-head wrench (only models with moonroof)
- Wheel cover remover (only models with wheel ...
